Mastering the Laser Cut Christmas Tree Decor SVG for Flawless Holiday Crafts
The holiday season brings a unique pressure to create decor that feels both personal and polished. For makers, crafters, and small business owners, digital files offer a shortcut to professional results, but they are not a magic wand. A Laser Cut Christmas Tree Decor SVG is more than just a downloadable image; it is a precise engineering blueprint for physical objects. When used correctly, this file allows you to produce a stunning 20 cm tall plywood tree that slots together seamlessly. However, many enthusiasts rush into cutting without understanding the nuances of material thickness and vector preparation, leading to wasted resources and frustration.
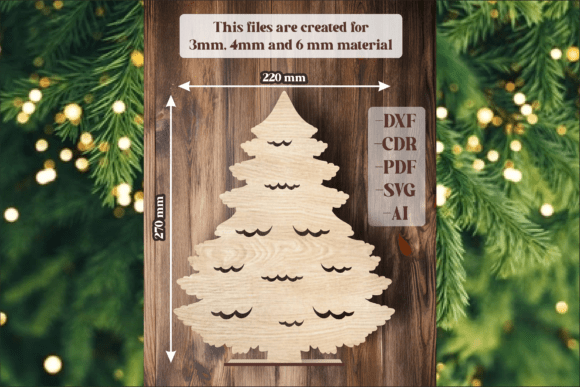
Understanding the difference between a graphic design file and a laser-ready vector is the first step toward success. This specific design is optimized for 3 mm, 4 mm, and 6 mm materials, which covers the most common plywood and acrylic thicknesses available to hobbyists. Yet, simply owning the file does not guarantee a perfect fit. The interplay between your laser’s kerf (the width of the cut), the material’s actual thickness, and the design’s tolerance levels determines whether your tree stands proudly or wobbles apart. By addressing common pitfalls early, you can ensure your project enhances your home decor or sells well at craft fairs.
The Misconception of Universal Material Compatibility
One of the most frequent errors beginners make is assuming that "3 mm plywood" is a standardized measurement across all suppliers. In reality, nominal thickness often varies significantly. A sheet labeled as 3 mm might actually measure 2.8 mm or 3.2 mm depending on the manufacturer and humidity conditions. If you cut a Laser Cut Christmas Tree Decor SVG designed for a tight 3 mm fit using material that is slightly thinner, the slots will be loose. The resulting tree may lack structural integrity, causing branches to sag or the entire structure to collapse under its own weight.
Conversely, if the material is thicker than expected, you risk forcing pieces together. This can cause the wood to split, ruining the aesthetic and potentially damaging your hands during assembly. To avoid this, always measure your material with digital calipers before starting. If your material deviates from the standard, you may need to adjust the slot widths in the vector file slightly. Most modern design software allows for offsetting paths, enabling you to tweak the design for a perfect friction fit. This small extra step saves time and material in the long run.
Overlooking File Format Specifics
The package includes SVG, DXF, AI, PDF, and CDR formats, catering to a wide range of users from Silhouette Cameo owners to industrial laser operators. A common mistake is choosing the wrong format for your workflow. For instance, while SVG is excellent for web-based cutting machines like Cricut, it sometimes interprets stroke widths differently than dedicated CAD software. If you open an SVG in a program that converts strokes to fills automatically, you might end up with double-cut lines or missing details.
For users operating CO2 or fiber lasers, the DXF or AI formats are often superior because they preserve precise vector paths without unnecessary metadata. Always inspect your file in the software you intend to use before sending it to the laser. Check for open paths, overlapping lines, or stray points that could cause the laser head to pause or cut incorrectly. A clean file ensures smoother operation and reduces the risk of burn marks caused by the laser lingering in one spot.
Neglecting the Assembly Process
Even with perfect cuts, the assembly phase can make or break your project. The design is engineered to be slot-together, meaning no glue is strictly necessary. However, many creators overlook the importance of grain direction. Cutting against the grain can weaken the tabs and slots, making them prone to breaking during insertion. Always align the longest parts of the tree segments with the wood grain for maximum strength.
Another overlooked detail is the finish. Raw plywood can look rustic, but it may also splinter or absorb moisture over time. Sanding the edges lightly after cutting removes char marks and smooths rough spots. Applying a clear sealant or paint before assembly can also enhance durability and visual appeal. Remember, the colors shown in promotional images are for example only. Your final result depends entirely on your choice of material and finish. Using high-quality birch plywood yields a light, elegant look, while walnut offers a rich, traditional holiday feel.
Scaling Issues and Proportional Integrity
The tree stands about 20 cm tall, making it ideal for tabletops, shelves, or mantelpieces. Some users attempt to scale the Laser Cut Christmas Tree Decor SVG up or down significantly to fit different spaces. While minor adjustments are acceptable, drastic scaling can distort the slot tolerances. If you double the size, the slots become twice as wide, requiring much thicker material to maintain a snug fit. If you shrink it too much, the delicate details may become impossible to weed or assemble.
If you need a different size, it is better to look for a design specifically engineered for that scale or to recalculate the slot widths proportionally. For the standard 20 cm version, sticking to the recommended 3–6 mm thickness ensures the structural balance remains intact. This size is particularly effective for handmade gifts because it is substantial enough to feel valuable but small enough to ship easily without excessive packaging costs.
Maximizing Value for Craft Fairs and Gifts
For entrepreneurs selling at holiday markets, consistency is key. Using a reliable Laser Cut Christmas Tree Decor SVG allows you to batch-produce items efficiently. However, do not underestimate the power of presentation. A bare wooden tree is nice, but adding a subtle touch of white paint to the tips or attaching a small LED tea light at the base can transform it into a premium product. Customers often buy with their eyes, so showcasing the tree in a styled setting helps them visualize it in their homes.
When preparing these for sale, consider offering customization options. Since the file is easy to modify, you could add names or dates to the base for personalized gifts. This adds perceived value without significantly increasing production time. Ensure that any added text is vectorized and properly spaced to maintain the structural integrity of the base piece.
Final Checks Before Cutting
Before you hit the start button on your laser, take a moment to review your setup. Verify that the focus height is correct for your material thickness. Test cut a small square or slot on a scrap piece of the same wood to confirm power and speed settings. This simple test prevents ruining an entire sheet of material due to incorrect settings. Check that the air assist is functioning to minimize charring, especially on lighter woods.
By approaching your project with attention to detail and respect for the material, you turn a simple digital file into a cherished holiday tradition. Whether you are decorating your own home or building a inventory for your small business, mastering the nuances of laser cutting ensures high-quality results every time. The Laser Cut Christmas Tree Decor SVG is a versatile tool, but its potential is fully realized only through careful preparation and thoughtful execution.