Christmas Book Candle Holder: A Practical Guide to Festive Laser-Cut Decor
The holiday season thrives on atmosphere. While store-bought ornaments have their place, there is a distinct warmth that comes from handmade or carefully curated decor. The Christmas Book Candle Holder has emerged as a standout piece for creators and homeowners alike. It combines the nostalgia of classic literature with the cozy glow of candlelight, creating a centerpiece that feels both intellectual and festive. However, bringing this design to life requires more than just hitting "print" on your laser cutter. Many enthusiasts overlook critical details regarding material selection, assembly techniques, and safety, which can compromise the final aesthetic.
This guide explores the practical realities of working with this specific lantern design. By understanding common pitfalls, you can ensure your project results in a high-quality piece that enhances your holiday décor or serves as a profitable item for your craft business.
Understanding the Design Mechanics
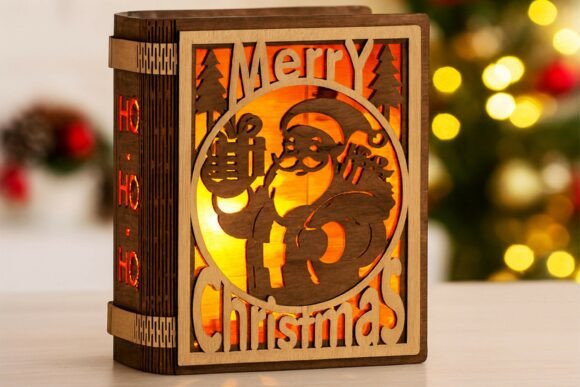
At its core, this project is a layered structure designed to create depth. The "book" shape features a festive “Merry Christmas” cutout, often accompanied by Santa motifs and decorative borders. When light passes through these layers, it creates shadows and highlights that flat decorations cannot achieve. The design is engineered for 3 mm material thickness, a standard for many hobbyist lasers and CNC machines. It relies on a glue-free assembly method, using friction-fit joints and slots to hold the pieces together.
While the concept sounds simple, the execution demands precision. The finished product measures approximately 170 × 131 × 62 mm (6.7 × 5.1 × 2.4 in). This compact size makes it ideal for mantels, dining tables, or gift exchanges, but it also means that small errors in cutting become highly visible.
Common Mistakes and How to Avoid Them
Even experienced makers can stumble when transitioning from digital file to physical object. Here are the most frequent issues encountered with this type of project and how to correct them.
Ignoring Material Tolerance
The most significant error is assuming that all 3 mm materials are created equal. Plywood, MDF, and acrylic all behave differently under the laser. If you use cheap plywood with voids or inconsistent thickness, the friction-fit joints will either be too loose, causing the holder to collapse, or too tight, leading to cracked edges during assembly.
The Fix: Always measure your material with calipers before cutting. If your sheet is actually 2.8 mm or 3.2 mm thick, you must adjust your vector files accordingly. Most design software allows for offsetting lines to account for kerf (the width of the laser cut) and material variance. Test cut a single joint first to verify the fit.
Overlooking Heat Management
Layered designs trap heat. When multiple sheets of wood or acrylic are stacked closely together, airflow is restricted. If you use a real flame candle instead of an LED, the heat buildup can scorch the inner layers or, in worse cases, pose a fire hazard. The design specifies LED candles or tea lights for a reason.
The Fix: Stick strictly to battery-operated LED lights. They provide the same warm, flickering ambiance without the risk. If you must use a real flame for a photo shoot, ensure the space is well-ventilated and never leave it unattended. For permanent display, LEDs are the only safe and practical choice.
Rushing the Assembly Process
Because this design is glue-free, there is a temptation to force pieces together quickly. However, the layered details require alignment. If you push the front cover on crooked, the "Merry Christmas" cutout will not align with the back panel, ruining the visual effect. Additionally, forcing tight joints can delaminate plywood edges, leaving unsightly rough spots.
The Fix: Assemble the holder in stages. Start with the base and side panels, ensuring they are square. Then, gently slide the decorative front and back panels into place. Use a soft mallet or your hands to tap pieces into position rather than hammering them. Patience here ensures a professional finish.
Choosing the Right File Format
The Christmas Book Candle Holder package typically includes SVG, DXF, AI, CDR, EPS, PDF, and DWG formats. Beginners often grab the first file they see, but this can lead to compatibility issues. For example, opening a DXF file in a program that doesn’t support certain curve interpretations can result in jagged edges or missing nodes.
If you are using a diode laser with proprietary software, SVG is usually the safest bet. For industrial CO2 lasers using CorelDraw or AutoCAD, CDR or DWG files may offer better control over line weights and cutting paths. Always inspect the file in your software before sending it to the machine. Check for open paths or duplicate lines that could cause the laser to cut the same area twice, burning the material.
Maximizing Value for Creators and Sellers
For small business owners and crafters, this item represents a strong opportunity. Holiday craft fairs are competitive, and shoppers look for unique, high-quality items. A poorly assembled book holder with burn marks or loose joints will sit unsold. Conversely, a pristine example can command a premium price.
To elevate your product, consider the finish. Lightly sand any minor char marks on the edges if using wood. You might also apply a clear matte sealant to protect the material and enhance the grain. Packaging matters too; since this is a fragile, layered item, ensure it is boxed securely to prevent damage during transport to markets or shipping to customers.
Final Checks Before Cutting
Before you commit your material, run through this quick checklist:
- Verify Dimensions: Ensure the scaled size matches your intended output. A 10% scale error can render the pieces unusable.
- Check Layer Order: In your design software, confirm that cut lines are distinct from engrave lines. Mislabeling these can result in engraved cuts or cut engravings.
- Test Fit: Cut one set of joints from scrap material to test the tolerance of your specific machine and material batch.
- Clean Your Lens: A dirty laser lens produces wider kerfs and more charring, affecting the fit and finish of intricate details like Santa’s beard or text.
The Christmas Book Candle Holder is more than just a decoration; it is a testament to thoughtful design and careful craftsmanship. By avoiding common mistakes related to material tolerance, heat management, and assembly, you can create a piece that truly brings the spirit of Christmas to life. Whether for your own home or as a product for sale, attention to detail transforms a simple cut file into a cherished holiday tradition.